|
|||||
|
|
|
|||||
|
|
|
|
|
 |

Contents:
Getting Started Guide: First Timers1) Download and InstallDownload the software from this website, and install it on your Windows XP, Vista, or 7 computer.2) Connect CameraSet your camera to 'M' mode, lens to manual focus, and turn off your camera's "Auto Power Off" feature via the camera menus. Then connect your camera with a USB (or Firewire) cable to your computer and wait for the computer recognize it.3) Start Eclipse OrchestratorDouble click the Eclipse Orchestrator icon on your desktop or in your Start menu.4) Old Canon User?A dialog will pop up. Click 'No' unless you will be using one of the listed cameras, introduced in 2000 thru 2003.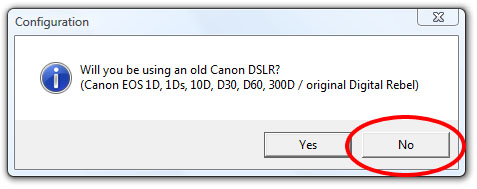
5) Enter Your Viewing SiteEnter the latitude and longitude of where you will view the eclipse, ideally to an accuracy of 100 meters. Once at your viewing site on eclipse day, you should use a GPS and get the exact latitude and longitude of your location.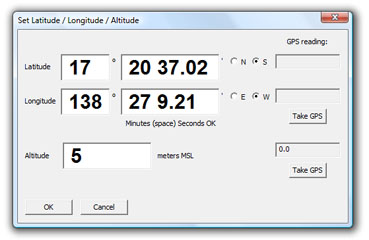
6) Name Your CameraMake sure your camera is selected in the pulldown 'Type/Model/Serial #' box, and then since the full name is so cumbersome, give it a short nickname in the 'Description' box.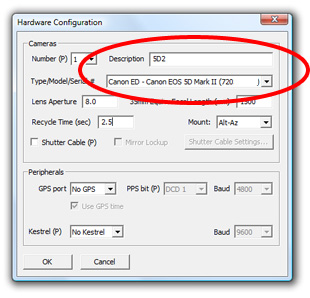
7) Restart The SoftwareYou will be prompted to close and restart the software. Please do so now, or else your changes won't take effect.8) Generate a ScriptThe easiest way to get going is to use the Script Wizard to generate a basic script for you. A script is a list of times at which to perform listed actions or exposures. Select 'File | Script Wizard...' from the menu bar. On the first screen, select which eclipse you're generating a script for.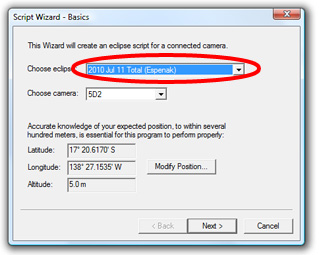
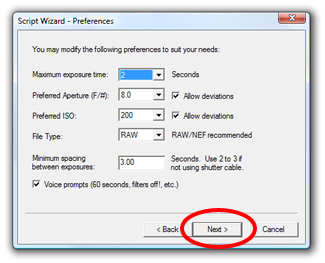
On the second screen, adjust the settings to your liking or just click Next to use the defaults.
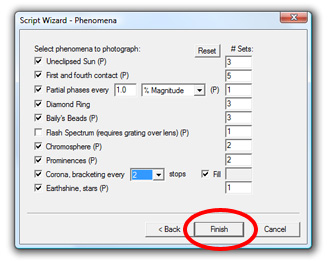
On the third screen, enable or disable the phenomena you wish to photograph. The '# Sets' numbers indicate how many sets of exposures will be taken of each phenomenon. You'll probably be coming back here to tweak the numbers based on how long totality lasts. Unless you've purchased Eclipse Orchestrator Pro, you won't have all these options available.
9) Customize Your ScriptNow you have a basic script that needs tweaking to your preferences. Open the Script Editor by selecting 'File | Edit...' from the main menu bar. In the example below we are changing the shutter speed. Items in the script need not be in order - the program will sort out the sequencing order later. That way you can group things in a more logical order. For rearranging or copying several exposures, it's probably quicker to use Notepad (menu item 'File | Edit in Notepad...').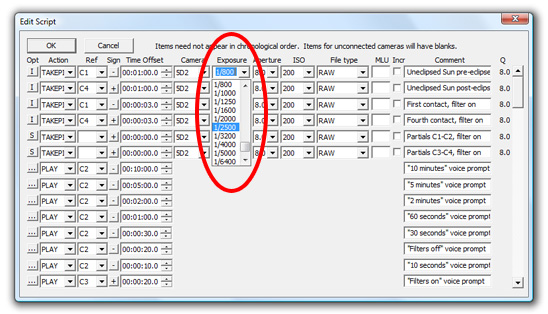
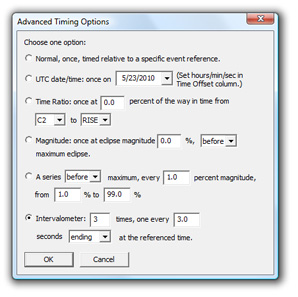
To access advanced features, click on one of the small buttons at the left of the editor, and then click 'Options...' on the popup menu. This will give you the ability to do bursts of exposures with the Intervalometer, or to trigger the exposure off other events.
10) Visualize ResultsNew in Version 3.2 is the Script Visualizer, a photo by photo list of exposures. By dragging a scroll bar or clicking Next/Prev Photo, you can step through your script, see an exposure in relation to other exposures, and a crude preview of what it will look like. The graph at the upper right plots exposures over time, with vertical axis height plotting each exposures' "Q", or absolute exposure setting (factoring in shutter speed, aperture, and ISO). Black boxes show when the shutter is actually open, with red tails representing the 'Recycle Time', which is how long before the camera is ready to take another exposure.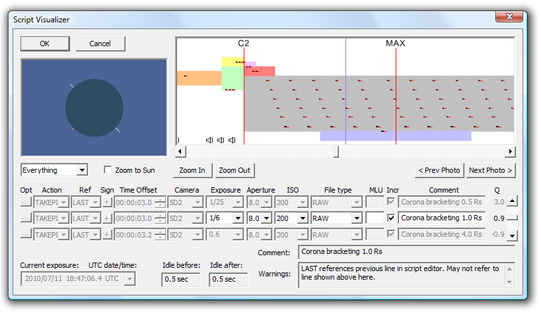
The vertical blue line overlays the selected exposure. Down below, the first and third exposure lines don't do anything other than provide reference. As you can see, only a subset of parameters can be modified here. You'll have to go back to the Script Editor to make more substantial changes.
The colored boxes in the graph represent suggested exposure times and settings for various phenomena. A good script will bracket in such a way as to fill out the boxes, to cover differences in camera sensitivity, atmospheric transparency, etc. The color code is: 11) Test Your ScriptKey to success is testing your script, over and over. And over. To do this, select 'Location/Time... | Simulated Second Contact' from the main menu bar. The time will jump ahead to 45 seconds before second contact. Listen to the camera and watch the exposure list on the main window as time progresses. If the camera misses an exposure or locks up, you've probably progammed too short of a time between exposures, and will need to delete an exposure or space them out more. With just a USB cable connected, 2-3 seconds between exposures is generally necessary.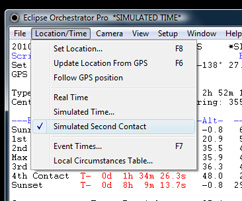
Once you determine the minimum amount of time between exposures that works reliably, visit the 'Setup | Hardware Configuration' dialog and update the 'Recycle Time' to that minimum time spacing, so that the Script Visualizer's red tails are the proper length. 12) Improving PerformanceAs you've probably found, the camera can be rather sluggish over USB. To improve performance, we recommend adding a serial shutter cable and upgrading to Eclipse Orchestrator Pro. A serial shutter cable acts as an electronic cable release, allowing much less time between exposures. The USB cable connection is still required to send shutter speed, aperture, and ISO changes, but the time consuming task of triggering an exposure can be offloaded to the serial shutter cable. In this way, up to about 2 to 3 exposures can be made each second, depending on the speed of your camera.Continue on to EO Pro Introduction. |
![]()
All text and images are © 2008-2020 Moonglow Technologies - All Rights Reserved.