 |
|||||
|
|
|
|||||
|
|
|
|
|
 |

Contents:
Eclipse Orchestrator Pro IntroductionIf you've purchased EO Pro or are considering it, this section will show how to get the most out of it. The features discussed here are only available in the Pro version. 1) Shutter CablesThe biggest advantage to EO Pro is the support for using serial port shutter cables. These special cables (ordered from a third party or built yourself) use a signal from your computer's RS232 serial port to release the shutter on your camera, while the exposure commands still travel over the USB cable. This way, your camera's internal buffer can be used to allow more rapid sequences of photos. Don't have an RS232 serial port on your computer? USB to serial converters work just fine, or the Shoestring Astronomy DSUSB adapter works great too.
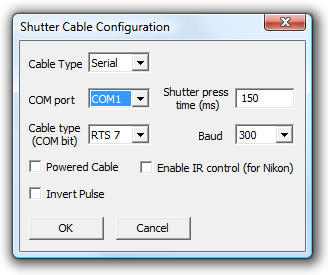
To get started, connect the cable to your computer, then enable 'Shutter Cable' in the 'Settings | Hardware Configuration' menu. Then go to the Shutter Cable Configuration screen and adjust the settings to match the type of cable you are using. Remember that you still need the USB cable connected. You will have two cables running from your laptop to the camera; the USB cable does the changes in exposure/aperture/ISO, while the shutter cable triggers the exposure to begin.
2) Multiple CamerasThe second big advantage to Eclipse Orchestrator is the ability to connect and control multiple cameras. This is a new feature, still in the experimental stage. Not all combinations of cameras will be successful. All supported Nikons seem to play together OK. Only Canon models Canon 1D Mark III, 1Ds Mark III, 5D Mark II, 7D, 40D, 50D, 450D/Rebel XSi, 500D/Rebel T1i, 550D/Rebel T2i, and 1000D/Rebel XS can be used in combination with each other.
Each camera has completely independent shutter speed, aperture, ISO, and file type control. Exposures can be synchronized among cameras to an accuracy of typically 0.5 seconds or better, or each camera can "do its own thing".
3) Live ViewThe Live View window with its Sharpness indicator is a fantastic tool to achieve pinpoint focus on Eclipse day. Select 'Window | Live View' from the main menu bar, then pick your camera from the 'Camera' menu in the Live View window. You can optionally turn on the Sharpness metric and grid lines. The higher the number, the sharper the image. For best accuracy, we recommend selecting 'Settings | Zoom In' once or twice. Try not to let the Sun move out of the field of view while focusing, as this will skew the results.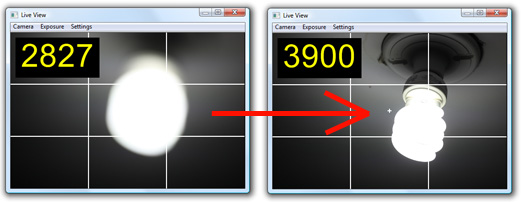
4) Bulb ModeNew in version 3.2 is full support for Bulb mode, allowing arbitrary exposure lengths. To create a bulb exposure, simply type the letter 'B' followed by the duration in seconds into the Script Editor. Bulb mode has a precision of about 0.01 seconds, so only exposures longer than 1/10 second are recommended.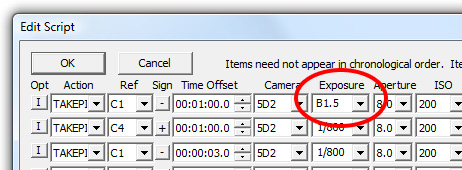
For the Canon 1D Mark III, 1Ds Mark III, 5D Mark II, 7D, 40D, 50D, 450D/Rebel XSi, 500D/Rebel T1i, 550D/Rebel T2i, and 1000D/Rebel XS, no serial shutter cable is required. For all other camera models, a serial shutter cable is required to trigger bulb mode, in addition to the USB cable connection. A few camera models like the original Canon 5D cannot mix bulb exposures with normal exposures. For this camera you'll have to manually turn the mode dial to 'B' instead of 'M' on the camera. 5) Mirror Lock UpIf you are using a serial shutter cable, you may use Mirror Lock Up to reduce the amount of vibration in an exposure. First, enable MLU in your camera's Custom Functions. Then in the Hardware Configuration menu, enable MLU. Finally, in the Script Editor, under the MLU column, enter the amount of time to wait between raising the mirror and opening the shutter. The default is 0.35 seconds if no value is entered.6) Script Wizard PhenomenaPurchasing EO Pro unlocks all of the available phenomena in the Script Wizard, giving you the easiest possible way to get up and running.
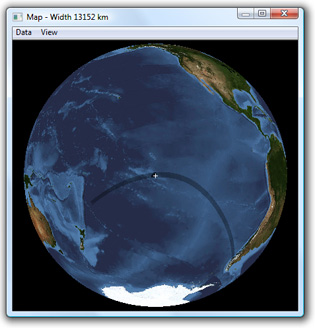
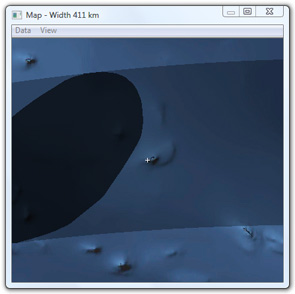
7) Satellite MapWith Eclipse Orchestrator Pro you can plot a realistic map of the Earth with the eclipse path and a real time animation of the shape and position of the Moon's shadow! You'll notice the shadow isn't perfectly elliptical - this is due to the effect of the highly accurate Lunar limb profile calculations.
Mousing over a portion of the eclipse track shows the duration of totality at that point.
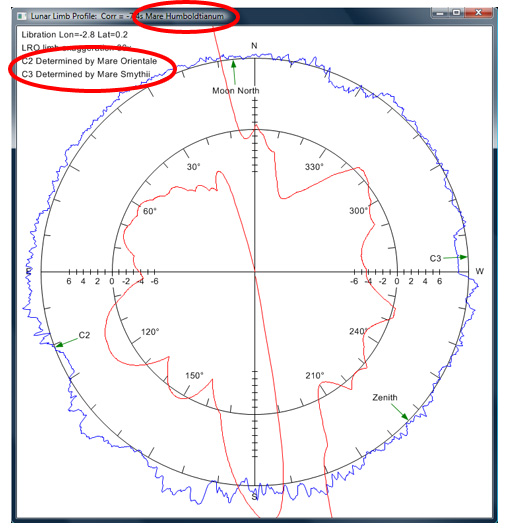
8) Lunar FeaturesNew in Version 3.2 is the ability to mouse over a portion of the Lunar Limb Profile and get the name of the feature on the Lunar surface you are seeing in profile (circled in red at the top of the window). Mousing over the red time correction curve tells you the name of the Lunar feature that determined that part of the curve. This way, individual Baily's Beads can be associated to a named place on the Moon!
Listed in the upper left of the window are the names of the features that determined second (C2) and third (C3) contacts. In this case, the last bit of light at second contact was through the depression of Mare Orientale and, for C3, Mare Smythii lets through the first light of the Sun, ending totality.
9) Command Line ActionsExternal programs can be invoked at scripted times, for example to execute special tasks or take data. In the example shown below we will start the Solitaire game.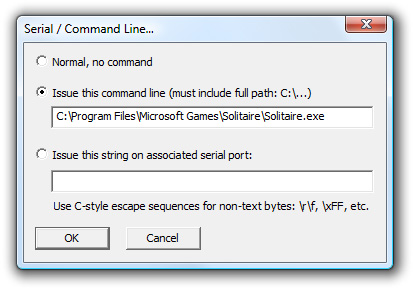
10) Serial Port ActionsFor the truly advanced user, arbitrary strings can be programmed to be transmitted out a serial port during a script. One possible use is to repoint a telescope, perhaps to build up a high resolution mosaic. The example string shown below could command a Meade LX200-compatible telescope to slew to a right ascension of 12h 34.5m and a declination of +67°89'.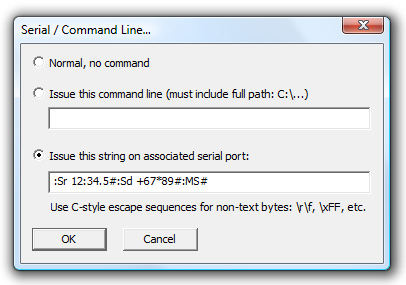
11) GPS Pulse Per SecondFor subsecond accuracy, a reliable timing source is needed. EO Pro can monitor the Pulse Per Second signal from a special GPS receiver such as a Garmin 18x-LVC, for an accuracy measured in milliseconds. This usually involves soldering the cable together yourself using our instructions.
Continue on to Supported Equipment. |
![]()
All text and images are © 2008-2020 Moonglow Technologies - All Rights Reserved.